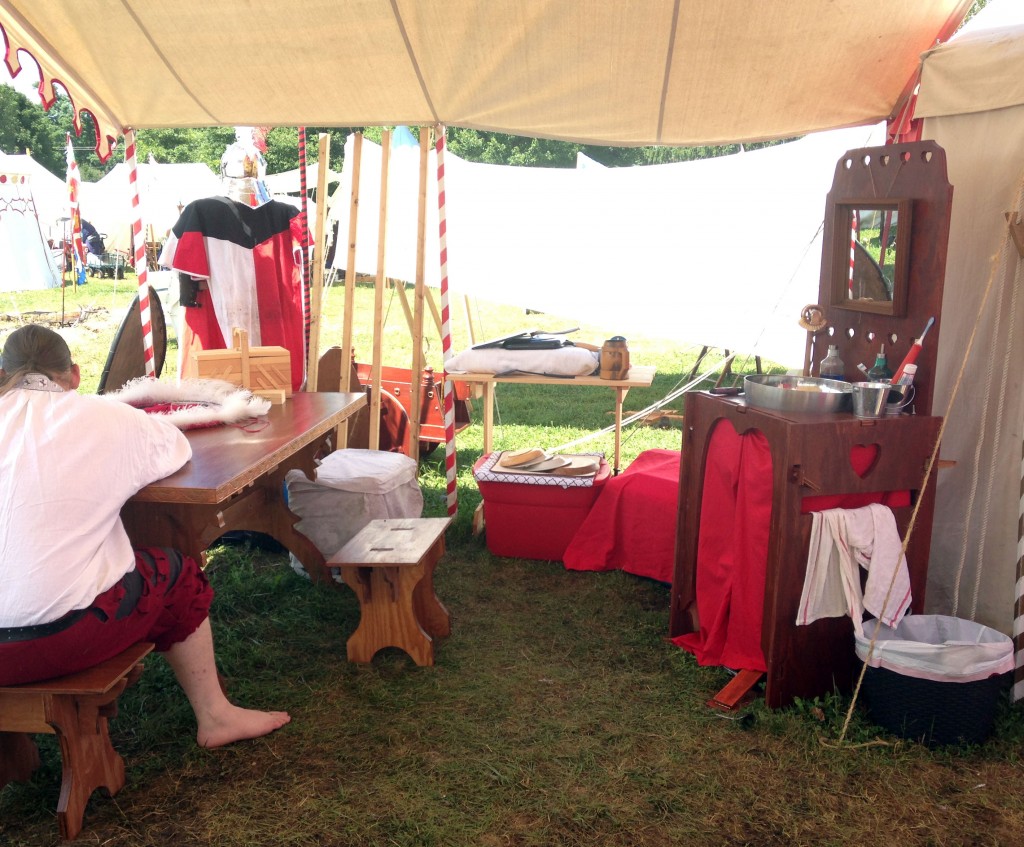
Build Your Own Camp Sink With Running Water: Materials and Plans
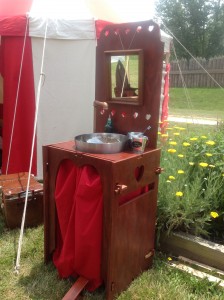
This year’s new SCA camp project was a wood and metal sink with “running” water. We wanted to be able to wash hands and faces, brush teeth, and wash dishes at our personal camp. The brushing teeth part was particularly important! So we made ourselves a relatively simple wooden stand that held a “sink” with “running water.” We didn’t actually have direct access to running water, though, which is what makes this a cool project. We did a test-run of our sink at a weekend event and then used it for two weeks at Pennsic. It worked like a charm, perhaps even better than we thought it would! So now we feel confident to share our plans with the world so you can make one yourself.
How It Works:
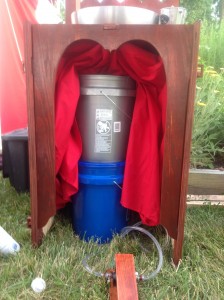
Fresh water is kept in a 5-gallon pail, which is then transferred up (with a foot pump) to a simple spigot from which the water flows. The waste water falls into the bowl, down a simple drain, and into a gray (waste) water pail. Very little water is used with this method. We only had to re-fill our fresh water bucket every 4-5 days. Yet thanks to the foot pump, we had a hands-free faucet to get water whenever we needed it. And the nice thing is that our modern pails were hidden by our wooden basin stand — the enclosed stand part is optional, as the wood will definitely add to your cargo load, but it made for a prettier camp.
What You Need:
- Two 5-gallon pails with lids (available at home improvement stores, such as Lowe’s or Harbor Freight for about $5)
- Fluid siphon pump (available at Harbor Freight for $5-$7)
- 10 ft of 3/8″ clear, vinyl tubing (available at Lowe’s for $1.22)
- 3/8″ brass fittings (available at Lowe’s)
- Rubber O-ring (available at Lowe’s)
- Hose clamps (available at Lowe’s)
- Various pipes and fittings (to suit your needs for the faucet, also at Lowe’s)
- Hinge (available at Lowe’s)
- Tennis ball, cut in half
- Spare wood and dowels (or just buy a 4″ x 1/2″ x 2′ whitewood board and a 3/8″ dowel at Lowe’s)
- Metal bowl to serve as your basin (available at IKEA for $15).
- Simple kitchen sink drain (available at Lowe’s for about $9)
Optional:
- One 4’x8′ sheet of 3/4″ plywood (Lowe’s)
- Wood stain and polyeurethane (Lowe’s)
- Metallic copper spray paint to make the pipes look nicer (Lowe’s)
- Cotton or linen material for the curtains to cover the buckets (old cotton sheet)
- Mirror to hang (old mirror I already had)
- Little pails to keep toothbrushes and soap in (IKEA)
- Glass bottles to keep dishwashing soap in (IKEA)
All told, the camp sink cost us about $100 in materials. If you choose not to use the optional materials, specifically the wood stand, it’s only about $60-$65 and your metal bowl rests right in the top of your gray water pail (without the pail’s lid on).
Tools:
- Power drill
- Saw
- Router (optional)
- CNC Router (optional)
The Sink Plans:
First, you need to put together the sink and get the water to flow up through the tube. We used the basic instructions at http://www.instructables.com/id/Field-Sink/ for assembling the tubes, pump, and pails. Changes we made were at steps 4-6 (we didn’t use another pail as our basin, but a metal bowl with a hole drilled in the bottom into which we fit the kitchen sink drain). Steps 8-9 were also skipped in favor of our wood stand (see below). Step 10 was also changed — we attached pipes to the top of our wood stand and then fed the clear plastic tubing up into the pipes (all the way to the end of the last pipe).
The Stand Plans:
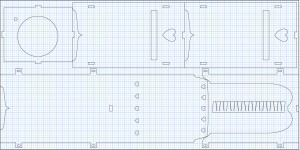
We made the wood stand to disguise all the modern bits. It packs flat (with the exception of the pipes, pails, and bowl) and is assembled with mortise and tenon keys. Here is the cutting plan for one 4’x8′ sheet of 3/4″ plywood:
And here is a PDF (CampSinkSImple) for a clearer view. We are also happy to send you the Adobe Illustrator file with all the vectors, if you want a better look or want to use it on a CNC router. E-mail genoveva (dot) von (dot) lubeck [at] gmail (dot} com.
The pieces go together quite simply. Use the tenon keys in the mortise holes to keep it all together securely. It is very stable — the sink actually went through a huge storm with 60+ mph winds and suffered no harm at all (it didn’t even tip over).
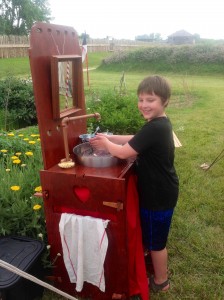
Here we are trying our camp sink for the first time at Baron Wars:
And here’s the pails and pump underneath:
And here is our camp sink as set up at Pennsic 42, after about a week or so of use.
Things to Consider:
- We had some issues with the woodcutting on the CNC router and did not re-cut due to time. Basically, I’d forgotten that the mortise holes should be cut on the INSIDE of the line, not the outside. Our mortise holes were too large and a couple broke (and our tenon keys did not fit properly). I may re-cut it in the future, though for now it’s still functional. I’ll probably wait until the wood shows signs of age and then replace it. Thankfully, a sheet of plywood is only about $40, so it won’t cost too much.
- The pump needs to be primed (step down on it a few times to get it going), and then the water must be pumped for each squirt. This wasn’t a problem, and it certainly saved water, but it’s good to know if you want to make this. So the water doesn’t run so much as squirt out, unless you’re pumping quickly.
- Wood is heavy. Probably obvious, but when you’ve got a lot of wood furniture as we do, it adds up. I LOVED having the sink with us at Pennsic, but I feel like I need to reduce the weight of my existing things if I’m to add anything new. I think that this sink could be done with 1/2″ plywood instead, but I won’t be sure until I try it. I’m thinking I could also make more and larger cut-outs on the sides and the back to reduce weight. If weight is also an issue for you, consider doing this as well. Also the back where the mirror hangs is really only there so we could hang a mirror and could also be eliminated if weight (or space) were an issue.
If you need more photos of any part of our sink, or details on where we found something, just ask! And if you make a camp sink, tell us about it — we’d love to hear what you did. Many thanks to hpstoutarrow at Instructables.com for posting the water pump idea!
Note: Our wood plans are free to anyone who freely distributes them (no selling please) — we ask only that we be notified and credited.

